May 12, 2026
A tech pack template is the starting point teams use to create a clear product document for production, organizing materials, specs, and construction details so a factory can understand what to build.
Many designers reach this point during the fashion design process. They try to create a tech pack from scratch, but the file stays incomplete. Key details are missing. The factory asks for clarification. Work slows down.
This usually happens when there is no clear structure in place.
A tech pack template gives structure, but it is not a finished tech pack. You still need to complete and review each section before production.
This guide explains what to include, shows a simple example, and walks through how to use it step by step.
TL;DR
A tech pack template is the starting point teams use to organize product details so factories can produce accurate samples and finished garments.
A complete template includes key sections like cover page, flats, BOM, measurement specs, construction notes, labels, and optional costing.
Teams typically build tech packs step by step by adding design details, materials, measurements, and construction instructions before sharing with vendors.
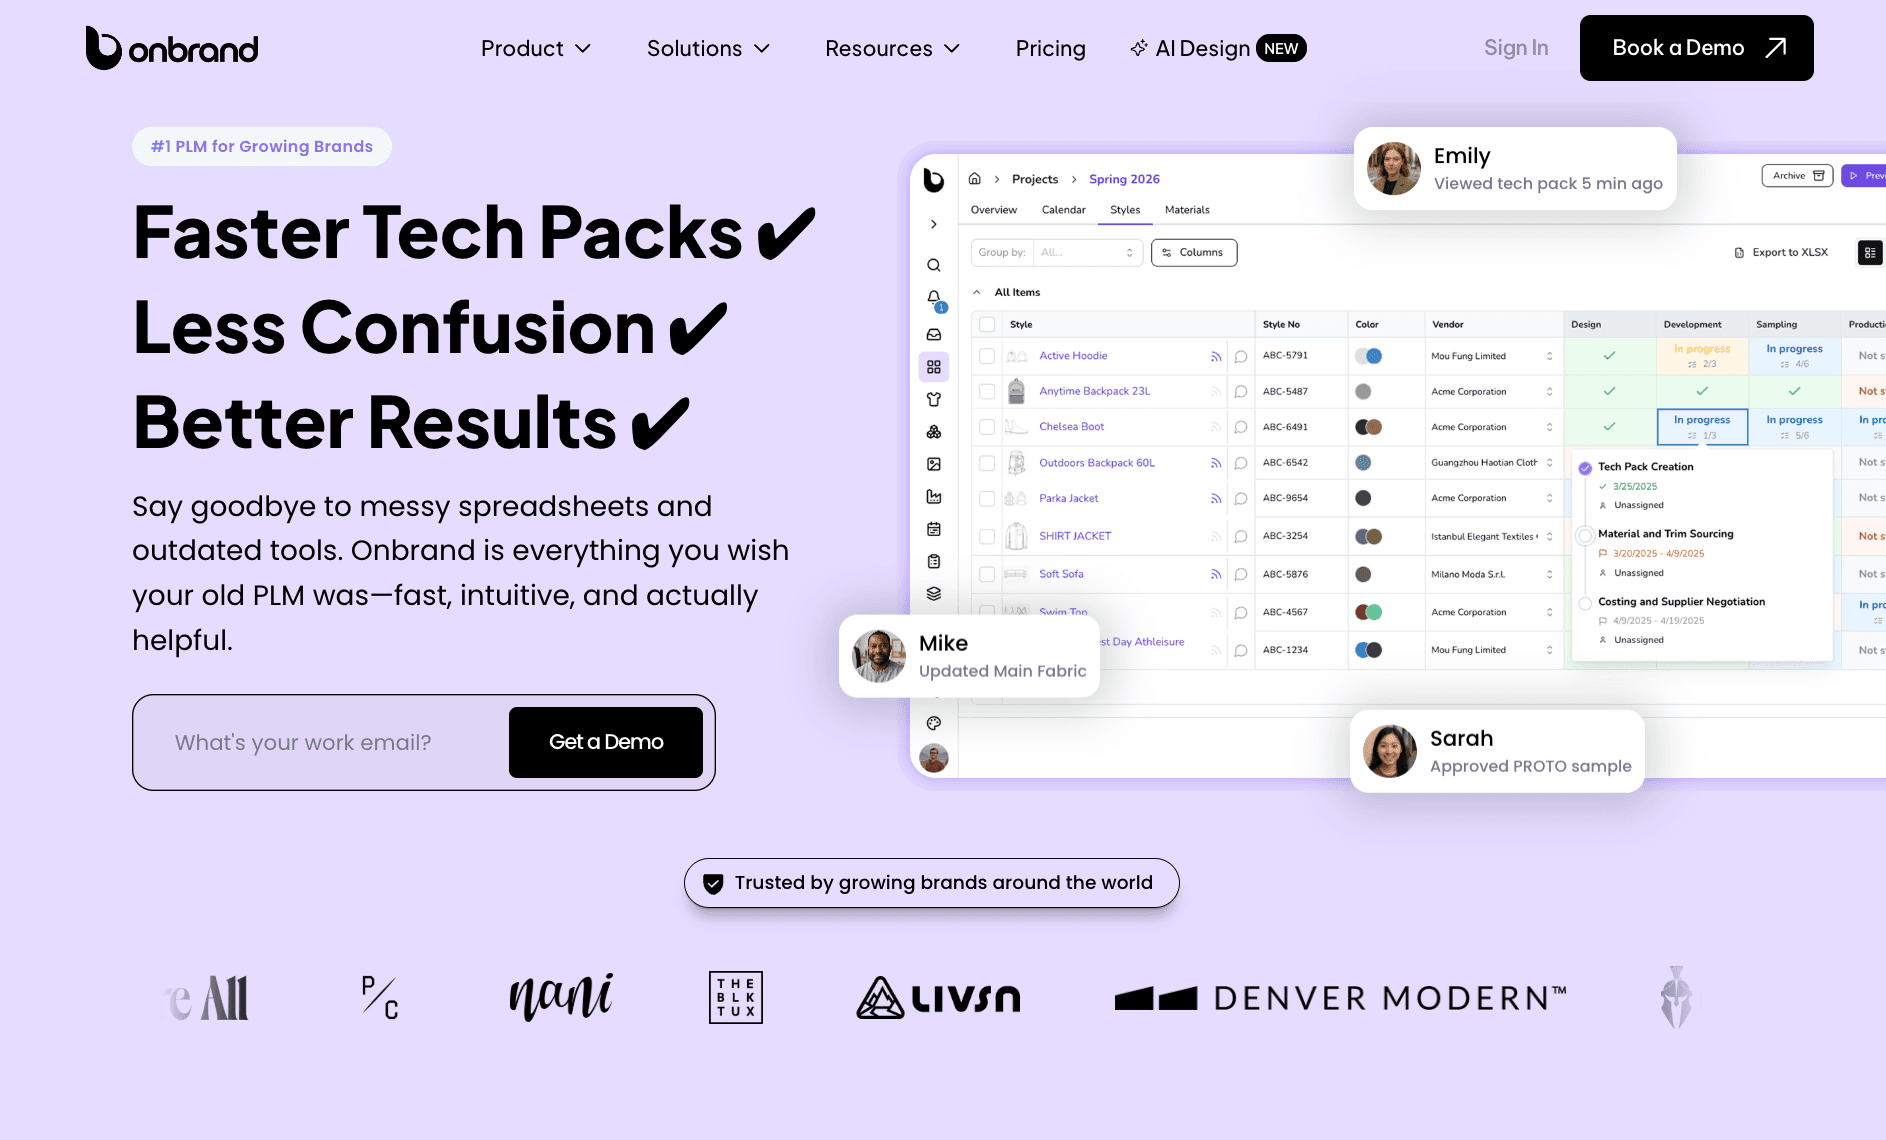
Common formats include Excel, PDF, and PLM templates, but static files become harder to manage as styles, updates, and collaboration increase.
Many teams move to structured systems like Onbrand PLM to keep tech packs live, track revisions, and manage updates in one place as production scales.
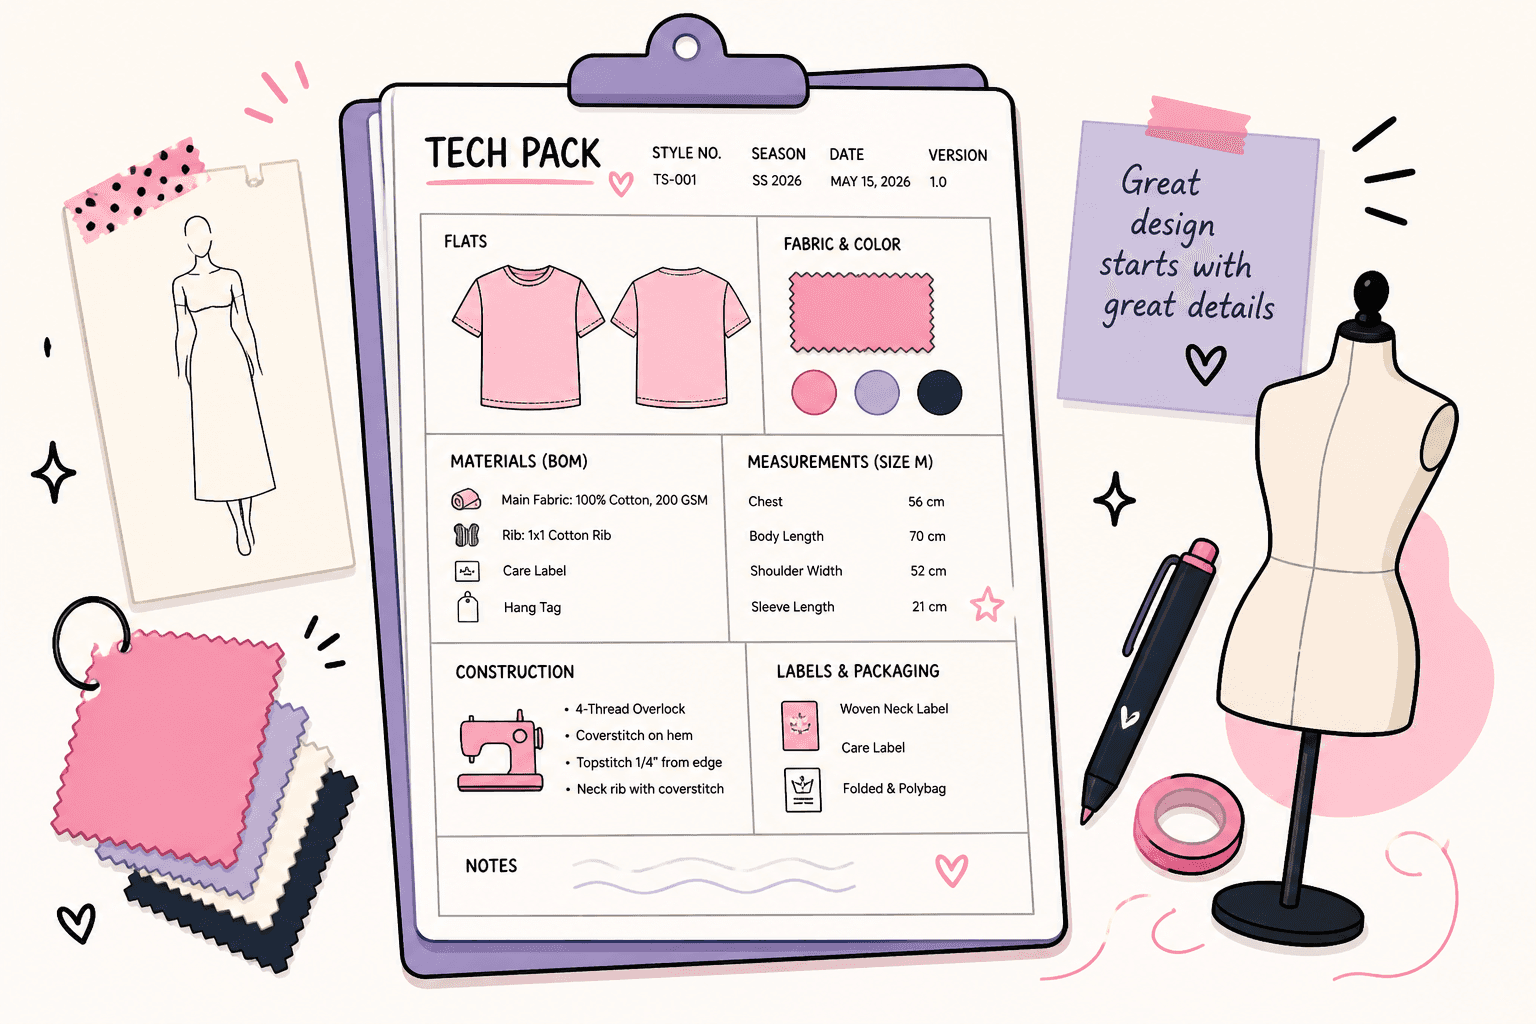
Free Tech Pack Template Structure (What to Include)
A tech pack template works best when sections are clearly defined and easy to fill out. Each one covers a specific part of the product, so nothing gets missed during development and production.
Section 1: Cover Page
The cover page sets the basic identity of the tech pack so the team and the factory know exactly what they are looking at. It keeps every version clear, especially when you start working on multiple styles at the same time.
Start with the style name or SKU, so your team and factory can reference it without confusion. Add the season or drop (for example, Spring/Summer 2026 or Holiday collection), so it is tied to the right timeline.
Include the current version and last updated date so everyone knows they are working from the latest approved tech pack, not an older file from a previous sample round.
Section 2: Technical Flats
Technical flats show the garment clearly, so the factory knows what to build. They support the technical specifications by turning your design into a visual reference inside the spec sheet.
Include:
Front and back views of the garment
Close-up callouts for details like necklines, pockets, trims, or stitching
Clear labels for construction areas (for example, side seam, sleeve opening, hem)
Keep the drawings clean and easy to read. Use arrows to point to exact placements, such as logo position, pocket height, or stitch lines. Add notes where needed, so the factory understands what each detail should look like.
When a design detail is hard to explain, include a reference garment or image to show intent.
Unclear flats leave room for interpretation, which often leads to incorrect samples, extra revisions, and delays during production.
Section 3: Bill of Materials
The bill of materials (BOM) lists everything needed to make the product. It tells the factory exactly which materials, fabrics, and trims to use so nothing gets substituted or guessed during production.
Include the main fabric with composition, weight, and finish (for example, 100% cotton jersey, 200 GSM, garment-washed). Add all trims such as zippers, buttons, labels, drawcords, and thread, along with size, color, and placement where relevant.
Use standardized color references like Pantone to define color codes and colorways, so factories can match colors consistently from sample to bulk. Include supplier names or codes to avoid confusion during sourcing.
Every entry should be complete. Gaps in the BOM often result in incorrect fabrics, color mismatches, or sampling delays.
Section 4: Measurement Specs
Measurement specs define how the garment should fit in production. The factory relies on these numbers to produce consistent sizes without guessing.
List the points of measure (POM) clearly so that each part of the garment is easy to follow. Include clear POM references or simple diagrams that show exactly where each measurement should be taken, such as chest width 1” below the armhole or body length from the high point of the shoulder.
Set a base size, like size M or size 8, as the reference to keep grading consistent across all sizes. Include tolerances (for example, ±0.5 cm or ±0.25”) so the factory knows what is acceptable during sampling and bulk production.
Clear measurements improve precision and help the team and factory stay aligned. Small errors here often lead to fit issues, repeated sample rounds, or rejected units.
Section 5: Construction Notes
Construction notes explain how the garment should be built during production. They guide the factory on stitch types, seam placement, and finishing so the final product matches the original concept.
Call out stitch types for each area, such as overlock stitching on side seams, single-needle hems, or coverstitch on cuffs. Include every specific detail, such as seam allowance, topstitch distance, and reinforcement points like bartacks at stress areas, so the factory can execute the garment correctly.
Include assembly details such as thread type, stitch density (SPI), edge finishing, or wash treatments where needed.
If the design includes a print, graphic, or embroidery, provide artwork specs with exact size and placement, for example, a center chest print 3” below the neckline.
Missing or unclear instructions often lead to incorrect samples, inconsistent quality, and extra sample rounds.
Section 6: Labels and Packaging
Labels and packaging define how the product is finished before it leaves the factory. They guide the factory on what needs to be attached, folded, packed, and signed off on before shipment.
Add all required labels, including care labels, brand labels, size tags, and hangtags. Specify exact placement (for example, care label at left side seam, brand label at center back neck) so everything meets your brand standard.
Outline folding instructions, such as flat fold, polybag fold, or hanger, together with packaging details like polybag size, barcode labels, carton quantities, and shipping labels, so units are ready for retail or warehouse intake.
These details help ensure every unit is packed the same way and ready to move through distribution without delays.
Missing or unclear instructions often lead to incorrect label placement, inconsistent folding, or packaging issues that require rework before shipment.
Section 7: Costing (Optional)
Costing gives the team an early view of how much the product will cost to produce. Some teams include it in the tech pack to stay aligned on target margins, while others manage it separately with vendors.
Add key cost inputs such as fabric cost per meter, trim costs, labor estimates, and the expected free-on-board (FOB) cost per unit. This gives the factory a baseline when preparing quotes or reviewing changes.
You can also note cost targets or thresholds so both your team and the factory stay aligned during sampling and negotiations.
It is optional, but it helps flag cost changes early and avoids surprises once bulk production begins.
Tech Pack Template Example
Here is a simple format your team can recreate in Excel or Google Sheets.
Section | Field | Example |
Cover Page | Style code | CT-001 |
Flats | Front view | Basic crew neck tee |
BOM | Main fabric | 100% Cotton, 200 GSM |
Specs | Chest (size M) | 56 cm |
Construction Notes | Side seam stitch | Overlock + topstitch |
Labels & Packaging | Neck label | Heat transfer, center back |
Costing (Optional) | FOB cost | $8.50 |
In practice, teams build this step by step. Fashion designers start with flats and basic details, then add materials, measurements, and construction notes as the sample develops. Updates continue through each sample round until the tech pack is approved for production.
Tech Pack Template Formats Fashion Designers Use
The format you choose affects how your team updates the file and how the factory reads it. Most teams start simple, then adjust once production gets more complex.
Excel or Google Sheets
Excel or Google Sheets is a common place to start. Teams love it because it is simple and already part of their workflow. It gives your team flexibility and freedom to adjust fields, layouts, and structure as the product develops.
It works well early on, but updates are manual. Versions get mixed up, and communicating changes becomes slower, especially during sampling.
PDF Templates
PDF files are easy to send to the factory and vendors. They lock the layout so nothing shifts when viewed on different devices.
Editing becomes a problem once changes start. Teams often go back to the original file, update it, then resend a new version. That creates confusion when multiple versions are in use.
PLM Templates
PLM templates are structured and built for teams managing more styles and updates. Product data stays in one place, and changes remain visible to everyone working on the file.
They help teams communicate updates more clearly and reduce back-and-forth during production. Instead of sending new files, the team and the factory work from the same live tech pack.
Many teams move to a fashion PLM system like Onbrand PLM when spreadsheets no longer support the volume of changes. It keeps the familiar template structure, but adds real-time updates, revision tracking, and shared access for the team and vendors in one place.
Common Problems With Tech Pack Templates
Most issues show up once the team starts working on real samples, and thousands of small updates need to be tracked.
Version confusion – Multiple files get shared through email, WhatsApp, or drives. The factory may be working from V3 while your team is reviewing V5. Small changes like a measurement update or trim swap turn into costly mistakes.
Missing or incomplete fields – Details get skipped or left blank. It seems minor, but the factory has to fill in the gaps. That often leads to wrong fabrics, incorrect trims, or construction that does not match the design.
Manual updates take time – Every change has to be updated in the file, then exported and resent. During active sampling, this can happen multiple times a week for several styles at once, which slows the team down.
Scattered product data – Information lives in different places. Specs sit in the tech pack, comments are in email, and approvals happen in chat. Teams end up chasing details instead of focusing on development.
Small mistakes can cost a lot of time and money during sampling and production. A template can feel like the perfect starting point, but it breaks once more things and people get involved.
Where Tech Pack Templates Work (And Where They Break)
Tech pack templates work well when the process is simple, and the team is small. They give enough structure to move a product from idea to sample without overcomplicating the work.
Where They Work
Templates fit small brands that are just getting started. They help during the early stages of the design process when styles are still being developed.
They also work for simple products with fewer variations, where the team can manage updates without too many moving parts.
At this stage, a template often feels like the ideal setup and gives teams something they can rely on.
Where They Break
Problems start once the number of styles and updates increases. Handling 10–20 styles at once makes version tracking more difficult, especially during active sampling.
When multiple teams are involved, files get shared through email or drives, and alignment starts to slip. During production, updates like fit changes or trim swaps must be tracked manually, which leads to version confusion and delays.
What worked for a few styles becomes difficult to manage once the team is handling multiple projects, vendors, and timelines at the same time.
Moving From Templates to Structured Systems
Templates work well early on, but they rely on files that need constant updates. As styles increase, product data gets harder to manage. Teams spend more time checking versions, fixing errors, and chasing details during production.
Structured systems solve this by keeping everything in one place. Tech packs, materials, approvals, and updates stay connected. The team and the factory work from the same information, which reduces confusion and speeds up development.
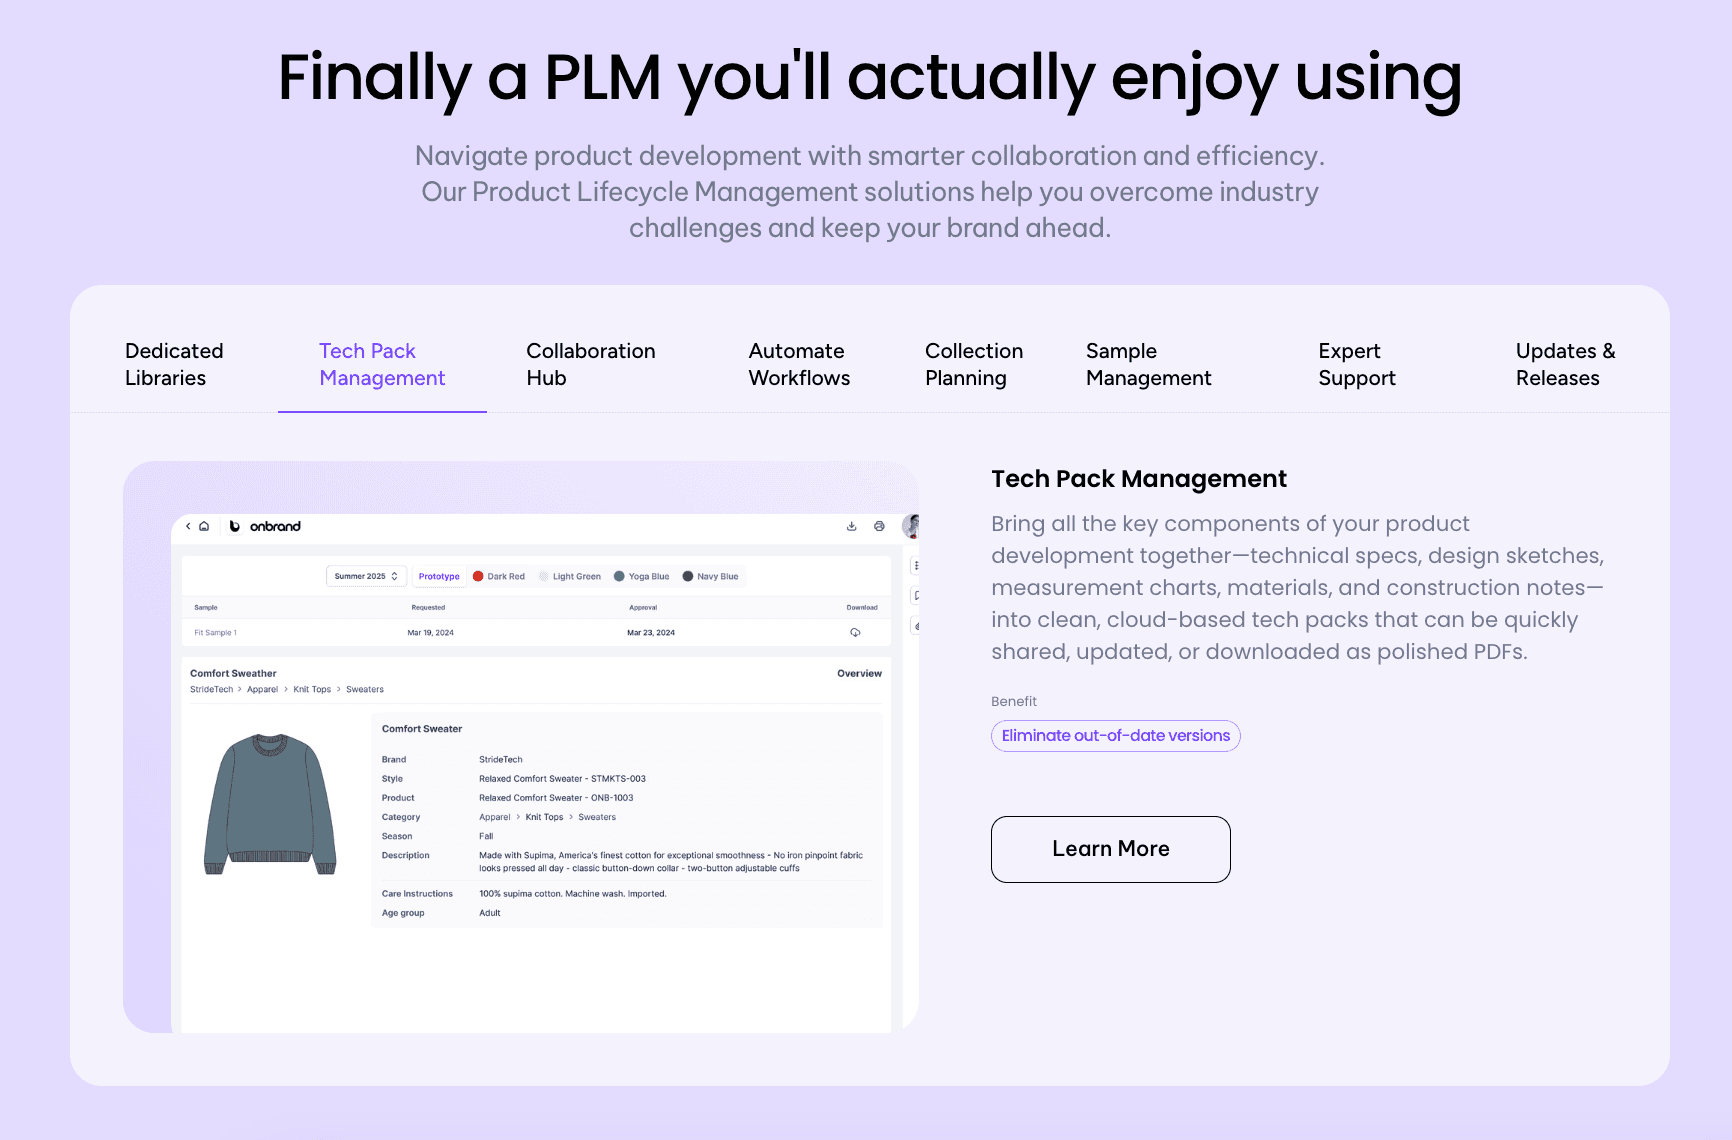
How Onbrand PLM Supports This Workflow
Many teams in the fashion world look for a way to keep the same tech pack template structure, but without managing separate files.
Onbrand PLM keeps that familiar format, but turns it into a live tech pack that updates in real time.
Instead of rebuilding or resending documents, your team works from one version that always reflects the latest specs, materials, and changes. Built-in templates and pre-set components also make it faster to create consistent tech packs from the start.
Brands using Onbrand have reported tech pack creation up to 55% faster and development timelines reduced by 4 weeks.
It also improves how teams manage updates and communication.
Revisions are tracked automatically, so the team always knows what changed and when. Comments, approvals, and updates stay inside the tech pack, which removes version confusion and reduces back-and-forth with vendors.
Onbrand also makes it easier to handle more complex workflows, such as working with multiple factories on the same style while keeping communication and pricing separate.
Onbrand AI Design supports the earlier part of the workflow. Designers can generate concepts, test variations, and create visuals before building the tech pack.

These outputs move straight into development and help transform how ideas become structured product data, so teams do not have to start over.
Some teams use this to reduce physical samples by 30–50% and save 10+ weeks each year during design and development.
Manage Your Tech Packs Better With Onbrand
A tech pack template gives your team structure early on. As styles, updates, and sample rounds increase, static files become harder to manage and keep in sync.
Onbrand helps teams keep that same structure in a live system. Tech packs update in real time, revisions stay visible, and materials, specs, and changes remain connected from first sample to production.
Instead of managing multiple files, your team works from one source of truth as products move forward.
See how your team can move from static templates to a live tech pack by booking a demo with Onbrand.
FAQs About Tech Pack Template
Can I send a tech pack template directly to a factory?
No. A template on its own is not enough. It needs to be fully filled out with specs, materials, measurements, and construction details before a factory can use it. Missing information usually leads to confusion, incorrect samples, and delays.
Who should use a tech pack template?
Small brands, independent designers, and early-stage product teams benefit the most. It gives them a simple structure to organize product details and share them with factories.
Are free tech pack templates enough?
Free tech pack templates are enough to get started. They work as a step-by-step guide for early product development. Most teams outgrow them as product data, revisions, and collaboration increase.
Can you skip a tech pack template in the design process?
No. A tech pack template should not be skipped once a product moves into sampling or production. Without it, the factory lacks the information needed to produce accurate samples and finished products.

